Nearly every expensive tenancy — the missed rent, the damaged unit, the eviction filing — traces back to a decision made before the keys changed hands. Screening is the highest-leverage hour in the entire rental cycle, and yet it is the step most often done by instinct: a quick look at a credit score, a phone call that never happened, a gut feeling about someone who seemed nice at the showing.
Instinct is also what gets landlords into fair housing trouble. When your process is undocumented, you cannot demonstrate that you treated two applicants the same way — and inconsistency is precisely what discrimination complaints are built from. The fix for both problems is the same: a written process you run identically every time.
This guide walks through that process end to end, in the order you should actually run it.
Step 1: Write your criteria before you advertise
Your screening criteria must exist on paper before the first inquiry arrives. Writing them afterwards — even honestly — means every decision is open to the argument that you invented the standard to fit the applicant.
A workable criteria sheet specifies:
- A minimum gross income multiple (for example, 2.5x or 3x monthly rent) and exactly which income counts
- A minimum credit score, plus how you treat thin or absent credit files
- Which public records disqualify, and a lookback period for each
- Rental history requirements — how many years, and how many prior landlord references
- Occupancy standards, stated per bedroom rather than per person where possible
- Pet, smoking and vehicle policies
- The documents every applicant must supply, with no exceptions
Step 2: Understand what you may not consider
The federal Fair Housing Act prohibits decisions based on race, color, national origin, religion, sex, familial status or disability. Sex has been interpreted to include sexual orientation and gender identity. These are the floor, not the ceiling — many states and cities add protected classes such as source of income, age, marital status, military status or criminal history restrictions.
Two areas catch well-intentioned landlords most often:
- Source of income. In a growing number of jurisdictions, refusing to accept a housing voucher is unlawful. Where it applies, your income multiple generally must be applied only to the portion of rent the tenant actually pays.
- Criminal history. HUD guidance has long cautioned that blanket bans on anyone with a record can produce a discriminatory effect. The safer approach is an individualised assessment: what the offense was, how long ago, and what has happened since.
Assistance animals are also not pets. A reasonable accommodation request for a service or emotional support animal is a disability question, not a pet-policy question, and your no-pets rule and pet fees generally do not apply to it.
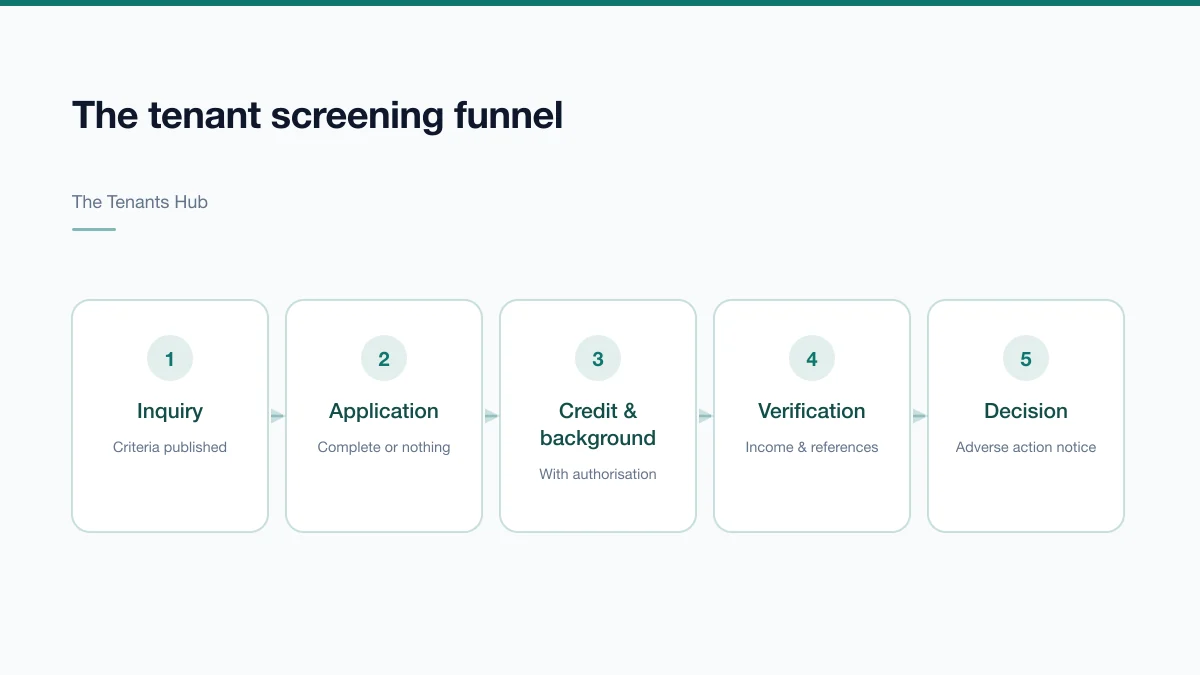
Step 3: Collect a complete, identical application
Every adult who will live in the unit — not just the person paying rent — should complete their own application and be screened separately. Partial applications are the main cause of slow decisions, so make completeness a gate: the clock does not start until everything is in.
Ask for full legal name and date of birth, current and prior addresses covering your lookback period, employer and income documentation, prior landlord contact details, government photo ID, and written authorisation to run credit and background checks.
Step 4: Run credit and background checks
Once you have written authorisation, pull the reports. Read past the headline score — the score compresses a lot of detail, and the detail is where the signal is.
On a credit report, look for prior landlord collections, utility collections, and the trend over the past twelve months. A 640 that has been climbing steadily after a medical bankruptcy tells a very different story from a 640 in freefall. Rent obligations tend to be paid before unsecured debt, so housing-related derogatories deserve more weight than a retail card.
On the background and eviction side, confirm that any record you find actually belongs to your applicant. Common-name mismatches are frequent, and acting on a misattributed record is both unfair and legally hazardous. Verify with date of birth and address history before it influences anything.
Step 5: Verify income against documents, not claims
The application says the applicant earns a certain amount. Your job is to confirm it independently. For salaried employees, two to three recent pay stubs plus a direct call to the employer's HR line — a number you looked up yourself, not one supplied on the application — is the standard.
Self-employed applicants need a different evidence set: the prior year tax return, three to six months of bank statements showing consistent deposits, and where relevant a letter from an accountant. Fixed-income applicants can supply benefit award letters. Housing voucher holders supply the housing authority's approval documentation.
| Applicant type | Primary document | Corroborating document |
|---|---|---|
| Salaried employee | 2–3 recent pay stubs | Direct employer verification call |
| Hourly / variable | 3 months of pay stubs | Bank statements showing deposits |
| Self-employed | Prior-year tax return | 3–6 months of bank statements |
| Fixed income | Benefit award letter | Bank deposit history |
| Voucher holder | Housing authority approval | Verification of tenant-paid portion |
Step 6: Call the previous landlord — and the one before
The single most useful call in screening is to the landlord *before* the current one. A current landlord who wants a difficult tenant to leave has an incentive to give a glowing reference. The prior landlord has no such incentive and will usually tell you the truth.
Keep the questions factual and identical for every applicant:
- What were the exact tenancy dates, and what was the monthly rent?
- Was rent paid in full and on time? How many times was it late?
- Did you ever serve a notice or file for eviction?
- Was the security deposit returned in full? If not, what was deducted?
- Did the tenant give proper notice when leaving?
- Would you rent to this person again?
A landlord who hesitates on "would you rent to them again?" has told you more than the previous five answers combined.
Verify that the reference is a real landlord and not a friend. Cross-check the property address against public records and confirm the phone number independently where you can.
Step 7: Decide, document, and send proper notice
Score the application against your written criteria and record the result — including the reasoning — for every applicant, approved or not. If a fair housing complaint arrives eighteen months from now, this file is your defence.
If you decline based even partly on a consumer report, the Fair Credit Reporting Act requires an adverse action notice. It must name the consumer reporting agency and give its address and phone number, state clearly that the agency did not make the decision and cannot explain it, and inform the applicant of their right to a free copy of the report within 60 days and to dispute anything inaccurate.
This obligation applies whether you decline outright, ask for a larger deposit, or require a co-signer. Any of those is an adverse action.
Making the process repeatable
A screening process only protects you if it survives a busy month. That means the criteria, the application, the verification checklist and the decision record need to live somewhere structured — not in an inbox and a spreadsheet that only one person understands.
The Tenants Hub keeps applications, screening status, verification notes and the resulting lease on a single record, so the audit trail assembles itself as you work. Once an applicant is approved, the same record becomes the lease and the tenant file — see our guide to lease renewals and rent increases for what happens at the other end of the tenancy, and how to reduce tenant turnover for keeping good tenants once you have found them.
Screening well is unglamorous work. It is also the cheapest insurance available in this business: a few hours of verification against months of lost rent and legal fees.